How to Solve Sudoku Puzzles – Real Tips and Advice (Part 3)

In the last part of this article, we had successfully completed solving 4 out of 9 squares of a Sudoku puzzle. Now we’ll continue by building on what we know.
When solving Sudoku puzzles, it helps to start with the “low-hanging fruit” – the parts of the puzzle that already have a lot of numbers in place. If we look at the squares, rows and columns, we can find opportunities to fit all 9 numbers into place based on what is already placed on the grid.
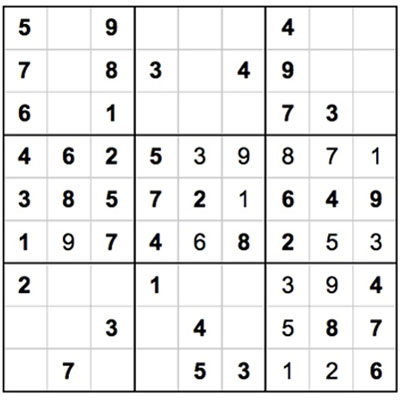
In this puzzle, the third column from the left has 7 out of 9 numbers placed. The only numbers remaining are 4 and 6. If we look across to the neighboring squares, we can see a 4 and a 6 in the lower right square. Now we can eliminate 4 and 6 – we know that the 4 needs to go in the bottom right corner of the lower left square, and the 6 needs to go in the top right corner of the lower left square.
We also have enough information to place a 1 in the lower left square – right in the middle. (There is a 1 in the left column and in the top row that runs into the lower left square – so that means that the only space left for the 1 to go is “square” in the middle of the lower left square of the grid.)
Now the only numbers left to place in the lower left square are 5, 8 and 9. Simple process of elimination helps place these numbers.
There are number 5s in the bottom two rows of the neighboring squares, so that means we can place a 5 in the top row (center column) of the lower left square.
Now the only two numbers left to be placed are 8 and 9. Again, we can use process of elimination – there is already a number 8 in the lower right square, middle row, middle column. So this means the 8 can be placed in the lower left corner of the lower left square, and the only remaining number, 9, can be placed in the last remaining spot.
Tying Up Loose Ends
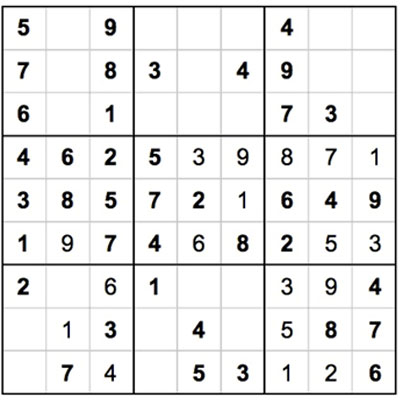
Every time we place a new number in Sudoku, it “changes the game.” Now that we have completed the lower left square of the grid, how does this affect the neighboring squares? What other rows or columns can we complete, based on what we now know?
If we look to the bottom middle square, top row, we see that 7 out of 9 numbers have already been placed. The only numbers missing are 7 and 8. In the middle square of the grid, there is a number 8 in the right column – that means we can place a 7 in the upper right corner of the bottom middle square, and we can place a 7 in the upper middle space of that square.
The bottom middle square has only 3 numbers left to place – 2, 6 and 9. By looking to the neighboring squares, we can see a number 9 in the lower left square, middle row – this means that the 9 can only be placed in the lower left corner of the bottom middle square.
Dead End? Try Somewhere Else.
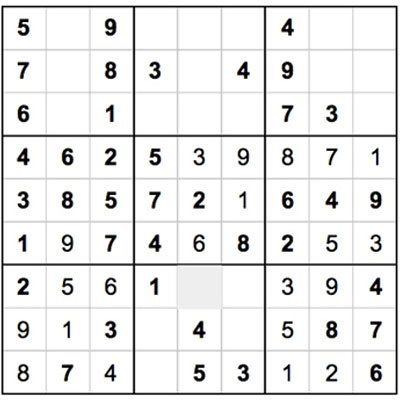
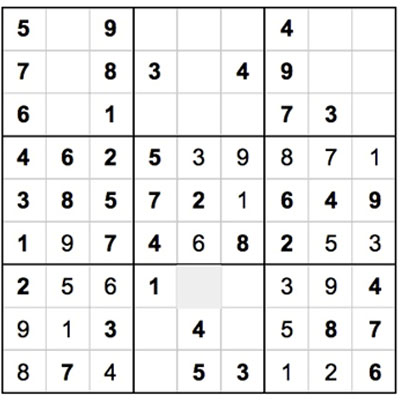
After placing the 9 in the bottom middle square, there are 2 spaces left – but we can’t figure out which numbers to place there. We have reached a temporary dead end. When you’re stuck, it’s often best to skip around to a totally different part of the grid. In this case, let’s look to the upper left square – where there are only 3 numbers left to place: 2, 3 and 4.
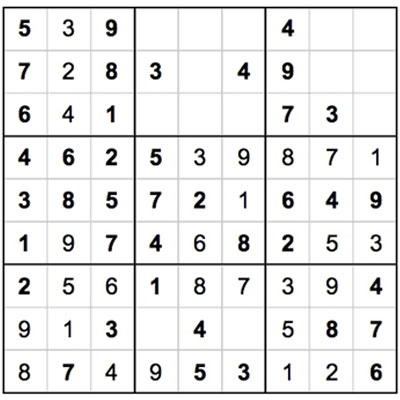
We can see 3s in the top middle square (middle row, left column) and top right square (bottom row, middle column). That means that the 3 in the top left square needs to go in the top row.
Now we need to place a 4 and a 2. There is already a 4 in the top middle square (middle row, right column), so that means we can place a 4 in the bottom row of the top left square, and a 2 in the remaining spot.
Now we have completed 6 out of 9 squares of the grid – this Sudoku puzzle is almost solved! Our next article will show the thought process for how to finish off this grid.