How to Solve Sudoku Puzzles – Real Tips and Advice (Part 2)
We’re showing you real tips and advice, step-by-step, on how to solve Sudoku puzzles. This is part 2 of how to solve a Beginner Sudoku puzzle, one square and row and column at a time. When we left off, we had just solved the two middle squares of the Sudoku puzzle, just by simple process of elimination and looking for “low hanging fruit” by solving the easiest-to-solve parts of the puzzle first.
Now we can build on that success by continuing to fill in the gaps based on the expanding knowledge we have of where the numbers need to go on the grid. This is one of the great things about Sudoku – every time you place a number, it makes it easier to place the subsequent numbers.
Focus on One Square
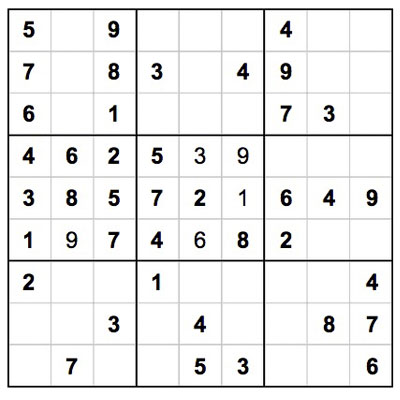
Let’s start with the middle row of squares, right column, bottom row. 7 out of 9 numbers have already been placed – the only missing numbers are 3 and 5. Keeping that in mind, let’s look around to neighboring squares to see if we can find evidence of where to place the 3 or the 5…aha! If you look in the upper right square on the grid, there is a number 3 in the middle column. That means we can eliminate the 3 from being in that column within the right-side middle square – and we can place the 5 there instead. That means we can also place the 3 to the right of the 5.
Now what is left to be placed within that square? Only 3 numbers are left to place – 1, 7 and 8. By looking to the neighboring squares (to the top and the bottom), we can see number 7s in the left and right columns – that means we know we can place a 7 in the top row, middle column.
Here is what we have now that we’ve placed the 3, 5 and 7:
We can’t use process of elimination to place the two remaining numbers in the middle right square, so let’s look to a different square and see what numbers we can place.
The strategy here, is that sometimes after we’ve placed a few numbers in a particular square, it opens up opportunities in a neighboring square.
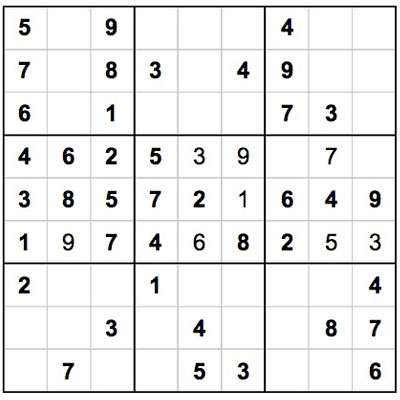
Lower Right Square
The lower right square currently has a 4, 7, 6, and 8. This means that the following numbers still need to be placed: 1, 2, 3, 5 and 9. If we look to the neighboring squares in the bottom row of squares, we see number 3s in each of the bottom two rows. There is also a number 3 in the top right square of the grid – that means we can place a 3 in the upper left corner of the bottom right square.
Now the only numbers left to be placed in this square are 1, 2, 5 and 9. By looking to the neighboring squares, we see 5s in the right middle square (lower row, middle column) and the bottom middle square (lower row, middle column). This means we can place the 5 below the 3 (next to the 8 and 7).
Now the only numbers left to place in this square are 1, 2 and 9. We can see another opportunity when we notice the 1 and 2 in the top row of the bottom left and center squares – this means that the empty space in the top row of the bottom right square can be filled with a 9. Can we finish off the square? Yes. We know that 1 and 2 are now the only numbers left to place – and we see a 2 in the middle right square, left column. That means we can place a 1 in the lower right corner of the lower right square, and we can place a 2 in the last remaining space. Just by noticing a few things on the grid, we have filled the entire lower right square.
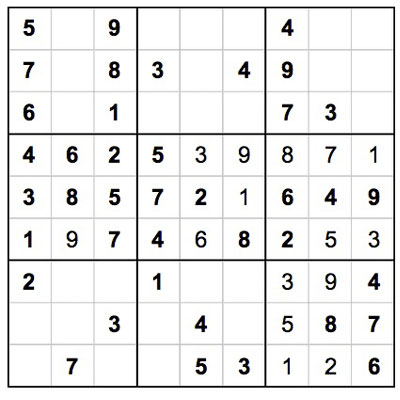
Tying Up Loose Ends
What has changed in the middle right square as a result of completing the lower right square? We now can complete the left column of the middle right square, because that column has 8 of 9 numbers placed. The only number missing from that column is 8.
We can easily place the 8, and then the 1 within the middle right square.
All of a sudden, we have made significant progress on this puzzle. 4 out of 9 squares are completely full.
In the next part of this article, we’ll show how to continue making progress in solving this Sudoku puzzle.