How to Solve Sudoku Puzzles – A Complete Walkthrough, Part 2

Build on Your Momentum
Sudoku is a game of momentum – every space that you fill in helps get you closer to solving the Sudoku puzzle. So it’s important – every time you figure out how to fill a new space – to immediately look to keep that momentum going. What did we just learn about the overall grid? How can we take the numbers that we’ve just placed, and use these numbers to decide how to place the next numbers on the grid?
Now that we’ve filled in a few spaces, we can build on our momentum and see what we’ve learned about the puzzle grid overall, so we can continue solving the rest of the Sudoku puzzle.
As shown in the figure below, the lower right square (outlined in green) is complete, and now we can look to the lower middle square (outlined in orange) to see if we can fill in some new spaces based on the new information we have from the empty spaces we’ve filled in.
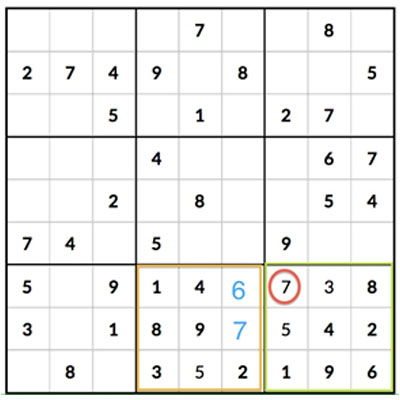
If we look to the orange square, there are only two empty spaces remaining, and we know that the missing numbers are 6 and 7. If we look to the right, the green square contains a 7 in the top right corner – so that means the top right empty space of the orange square cannot contain a 7 and must (by process of elimination) contain a 6 (written in blue).
That also shows us that the last remaining space in the orange square must contain a 7 (written in blue).
Now that we’ve solved the first two squares (out of 9 total squares in the grid), let’s look at the next square to the lower left and see what else we can solve.
Complete the List
Sometimes it’s easy to finish solving a row or column just by completing the list of numbers, 1-9. For example, in the lower-left square of this grid shown below (outlined in orange), there are two rows that are almost totally full – outlined in green.
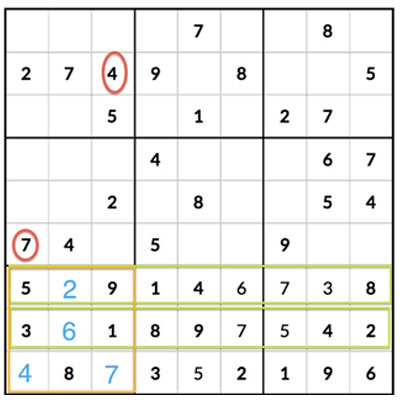
Since there is only one empty space in each of these rows, we can quickly check to see which numbers are missing from each row and fill them in.
In this case, it’s a 2 (in blue) in the top row, and a 6 (in blue) in the middle row. This leaves us with two empty spaces in the lower left and lower right corners of this square – which we know from process of elimination have to be number 4 and number 7.
Fortunately, there is a 4 and a 7 (circled in red) in the rows above – so we can eliminate each of these numbers, leaving only a 4 as the last possibility for the lower left space, and a 7 for the lower right (both numbers marked in blue).
All of a sudden, just by doing a few simple process-of-elimination exercises, we’ve already solved 1/3 of the grid. In the next article in this series, we’ll try to keep the momentum going.
Please read part 3 of this series on how to solve Sudoku puzzles, using this actual game as an example. (Coming soon!)